
Owl Wetbag Tutorial


For one wetbag you will need:
1/4 yard of fabric for the top that will hang over the edge of your pail (I used owls)
1/2 yard of PUL fabric
1/2 yard of simple fabric for the outside of the bag (I used some leftover muslin)
(optional) 50" of cording and a toggle
Baby Powder to keep the PUL from sticking to your sewing machine's foot
Step1) Pick and prep. Pick your fabrics, then wash, dry and iron your fabric (don't wash or iron the PUL).
Step 2) Cut your fabric. Cut two rectangles of PUL that are 18 1/2" x 20". Cut two rectangles of muslin that are 19 1/2" x 21". Cut two small rectangles of owl fabric that are 5" x 21".
Step 3) Hem the bottom of your owl fabric (the 21" side) by folding over 1/4" and sewing a straight seam.
Step 4) Create a drawstring pocket on the top of your owl fabric (if you want to use the cording and toggle) by folding over 1/2" of the 21" side of the your fabric and sewing a hem.
Step 5) Hem your PUL on the 20" side by folding the shiny side onto the dull side 1/4", then sew twice to reinforce your seam. PUL is tricky to sew because it will stick to your machine's foot. Solve this problem by sprinkling some baby powder along the edge as you sew.
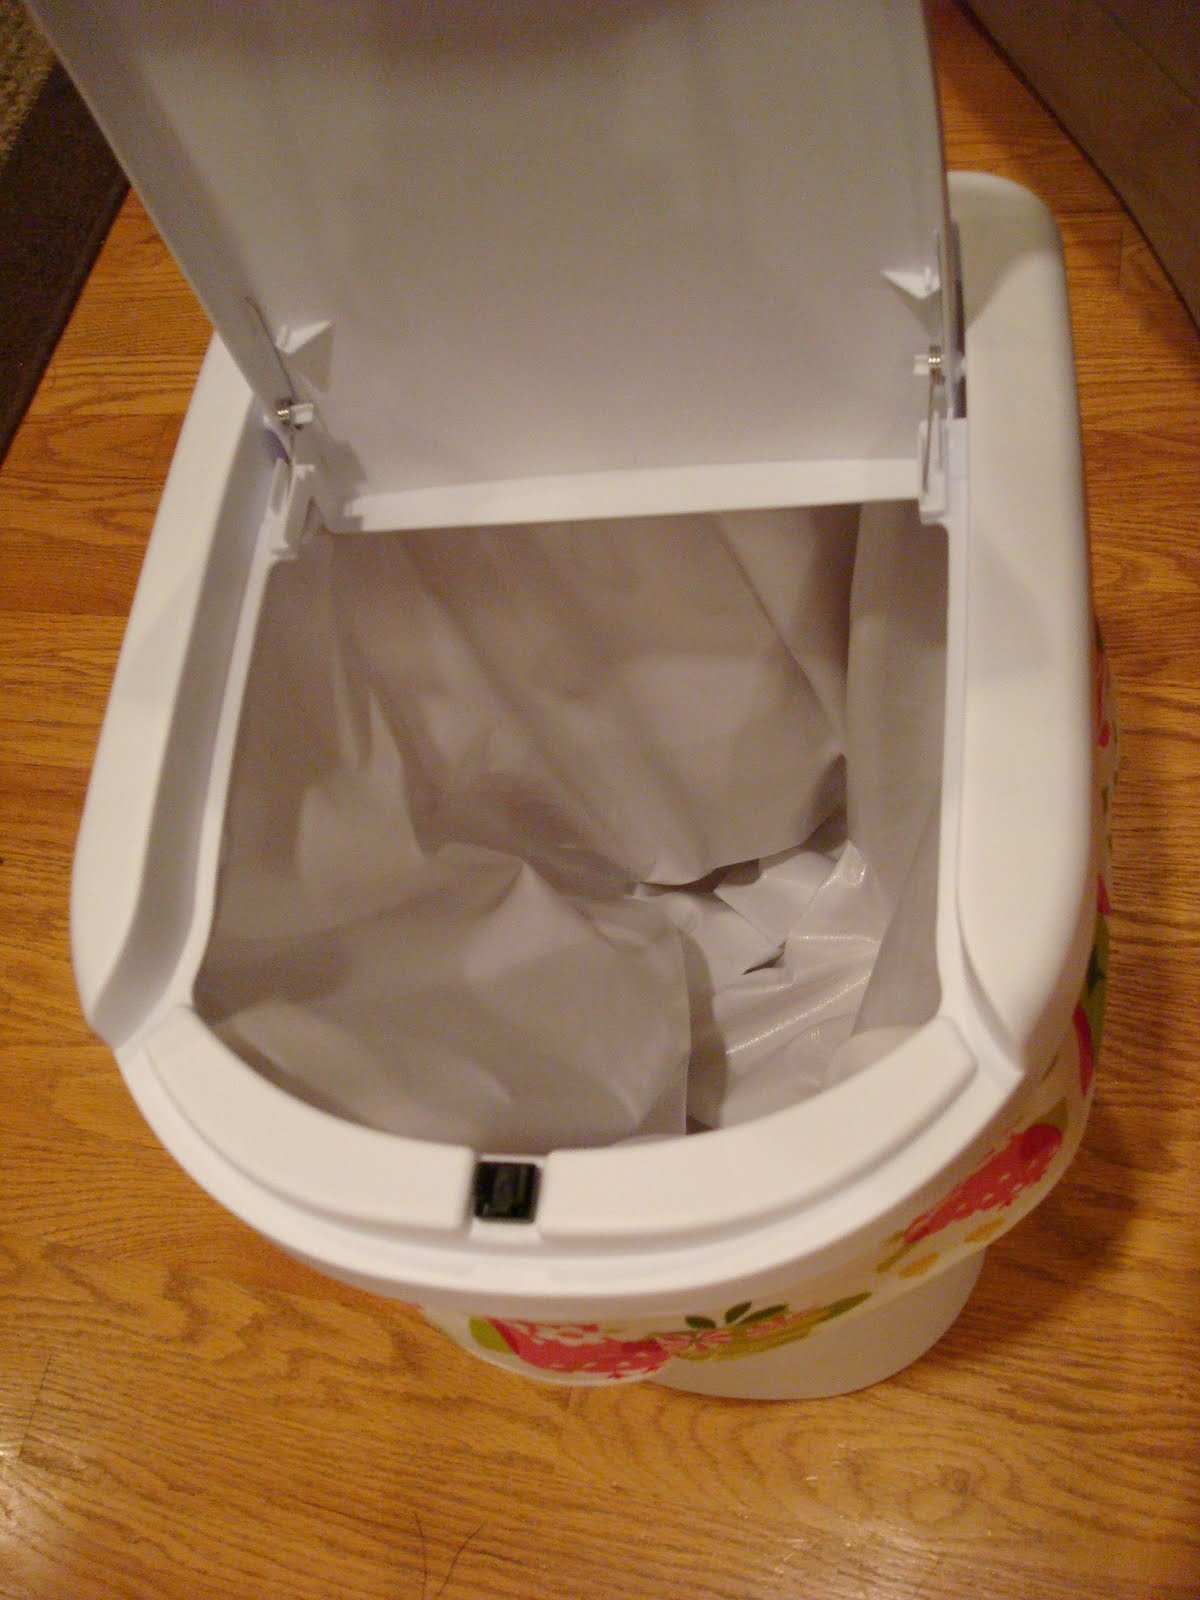
Step 6) Create the base the bag. The PUL fabric has two sides: a shiny and a dull side. The shiny side is waterproof and needs to be on the inside of the bag. Layer your two rectangle muslin pieces with the two PUL pieces: PUL (shiny side down, two layers of muslin, and PUL shiny side up). Pin these four layers together only at the very edge of the PUL (the more pinholes you make, the less waterproof it will be). Sew 1/4" seam along all 4 layers on just 3 sides (don't forget the baby powder). Sew twice to reinforce your seams. Turn rightside out. The shiny side of the PUL should now be inside the bag and facing each other.
Step 7) Attach the owl fabric to the base. Pin the drawstring side of the owl fabric to the top inside edge of the muslin, right sides together. Sew along the very edge of the owl fabric, being careful to leave enough room for the drawstring. Sew twice to reinforce the seams. You should now be able to put your liner into the trashcan and have your owl fabric lay over the top.
Optional:
Step 8) Thread your cording through the drawstring pouch by wrapping tape around the end of the cording and attaching a safety pin. Thread the pin through the drawstring pouch.
Step 8) Thread your cording through the drawstring pouch by wrapping tape around the end of the cording and attaching a safety pin. Thread the pin through the drawstring pouch.
Step 9) Attach your toggle according to the package instructions (slip both ends through while holding the "button" down and tie a knot).
Note: this is my first time writing a tutorial for something that sounds really complicated so feel free to ask questions and I will do my best to answer! :)
Hi,
ReplyDeleteThanks for the great idea! You have inspired me to try as well. I am newish to sewing but was just wondering how you prevent the area you have sewn from leaking?
Thanks,
Sarah
You can seal the PUL by washing it and drying it on a hot setting. You just don't want to do this every time because it will cause the PUL to peel away from the dull side. But doing it once in a blue moon should be ok.
DeleteMine doesn't leak, even where sewn. I think the double layers of PUL plus the outside cotton helps. I think if you sew the PUL securely (meaning don't un-do and re-do your stitches and make sure you get both pieces into the seam securely) then you should be fine. Good luck!
ReplyDeleteThanks for the post!! We're going to be starting CD'ing in December. We bought the same garbage bin from Target, how do you find it does with smells. Did you put a charcoal disk on the lid?
ReplyDeleteI did occasionally sprinkle some baking soda in my wetbag if I knew it would be longer than normal before I did a wash, but honestly it did just fine without any further measures. No one ever commented on the smell (even my husband)--I think the lid helps tremendously. Certainly there is nothing wrong with putting a CD-friendly deodorizer in there--up to you!
DeleteWhat are the height, width, and length of your garbage bin? Also, is it a 7 gallon bin? I'm trying to calculate measurements and fabric for the garbage can that I have. Thanks!
ReplyDeleteHere's the one I have, Jess: http://www.target.com/p/sterilite-click-top-medium-wastebasket-28-qt/-/A-13673967#prodSlot=large_1_7. It is 18.0 " H x 11.3 " W x 14.12 " D. Good luck to you!
Deletehow many days between washing
ReplyDelete