Wednesday, August 22, 2012

Another Tin!

In 2008 (ish) my family started doing an annual Cookie Baking Weekend Extravaganza. I didn't have any cookie tins at the first gathering, so my sweet mother gave me all the tins that she didn't particularly enjoy. Some of them are a bit...outdated and none of them are really me except the sleigh scene pictured lower left. So last year I decided to start collecting my own tins. I am so pleased with how this collection is coming!

In July I stopped by the CUTEST little antique store in Saugatuck, MI where I spotted the red beauty in the bottom right corner:


Better still I talked them down to $3! I'm already on the lookout for the next additions to my collection of sleigh tins. If you spot one, let me know! :)


Pin It

Sunday, August 19, 2012

Summer Salad

Summer Salad
This salad represents the epitome of summer to me. Major yum. Goes great with BBQ, Indian food, or on its own as a healthy lunch!


One large ripe tomato
One large ripe cucumber
1/4 red onion, sliced and chopped
1/3 cup Italian dressing

Mix all (vary the proportions if you'd like). Chill several hours before eating to let the flavors meld. Tastes even better the next day, although you can eat it right away if you can't help yourself.

Pin It

iPhone Trick for Mama's with Squirmy Kiddos

Smart people probably already have this figured out but I didn't until my daughter was about 7 months old. We all have photos that look like this:


She looked at the camera and smiled right BEFORE this photo was taken. It will now be deleted because the shutter speed on the iPhone camera is too slow to catch the movement and it's a bit blurry. THERE'S A SOLUTION!! Take a VIDEO of your child and try to get them to smile at the camera. Focus on keeping the camera centered on the kiddo and do whatever it takes to get that baby to look at you and smile. Notice the high-pitched talking and face-making that goes on in the below video to get her to smile...if possible:


Then after you've taken the video view it but pause it instead of playing it. Use the cursor at the top of the screen to navagate the video and find the perfect spot where your child looks cute. Then tap the screen once to get rid of the cursor. Now take a SCREEN SHOT by holding down the center button and the power button at the same time. Your new photo will go the end of your camera role. This is the photo I got from taking the above video:


 It's not as high quality of a photo as it could be, but your baby will look cute! Now a little tweaking on picmonkey.com and I've got a pretty nice photo (for an iPhone with a slow shutter speed)!


So to recap, (1) take a video (2) pause the video in the perfect spot (3) take a screen shot. Enjoy!

Pin It

Tuesday, July 24, 2012

Rick Rack and Minky Baby Blanket

I used this tutorial to make baby Campbell's soft minky blanket. I have made about 12 quilts, so I can say with confidence that this is WAY easier! It's more like a giant pillow case with no stuffing. I didn't use an exact measurement for the fabric, I had a large scrap of blue minky left over from the crib bumpers, so I just cut the brown Waverly Parterre Walnut fabric to the same size. Cutting the corners off to make rounded corners makes attaching the rick rack much more simple (and it's another way to make your blanket special). I sewed the rick rack to the cotton fabric because attaching it to the minky would have been way too slippery. I'm not a very faithful pinner, so I just laid the rick rack and tried to keep it equidistant from the edge of the fabric.

To end the sewing on of the rick rack, I overlapped them, draping the ends off the fabric:


Then, I laid the minky fabric on top, pinned, and stitched all the way around leaving a 4" hole, through which you then turn everything right-side-out and press. Finally, I topstitched around the whole thing--done!


So cute, so cuddly, and so fast! You can see more photos of the finished room here. I don't know if I'll ever make a typical baby quilt again--this was way too easy, still special, but less fragile!


Pin It

Monday, July 23, 2012

Pleated Crib Skirt


For baby Campbell's crib skirt, I used the tutorial in Amy Butler's "Little Stitches for Little Ones" book. I used the little blue dot fabric within the pleat as well as on the short sides so that there are two contrasting fabrics. You can see more photos of the bedroom here.


Pin It

Sunday, July 22, 2012

DIY Crib Bumpers

I followed this tutorial from Sew4Home(which you really should follow, by the way--awesome site) to make baby Campbell's crib bumpers. I used light blue minky for the interior of the bumpers, plain blue for the ties and piping and I used Waverly Parterre Walnut for the exterior. So classy and modern--I love it! My sewing machine doesn't have a zipper foot, so I just used my regular one. Also, I didn't buy enough fabric to be able to make bias strips, so I just cut 2 1/4" strips. They "give" less, but it worked and I didn't have to make another run to JoAnn.


More photos of his whole room can be found here.


Pin It

Saturday, July 21, 2012

Scrappy DIY stuffed animals and burp cloths

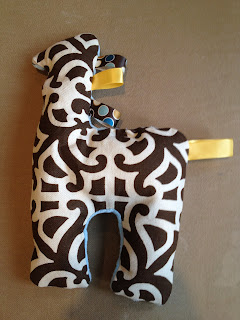
I had some fabric scraps from when I made baby Campbell's bedding (see photos of the finished product here). Can't keep it in the scrap bin--it belongs in his room! So I whipped up some stuffies! Never made any stuffed animals before but basically they are just pillows (probably obviously to everyone else on the planet, but I was really quite surprised by their sewing simplicity). I followed this tutorial for the elephant (isn't that just darling?!) except that I hand-stitched the ear to gather it since my sewing machine doesn't have that function (at least I couldn't find it). And I followed this tutorial for the giraffe. I stuffed the elephant plenty full so he'd stand up more readily, but I left the giraffe soft and mostly flat, so it's more of a tag blanket/lovie. Couldn't be happier with this project and it took me all of 30 minutes to make them both.


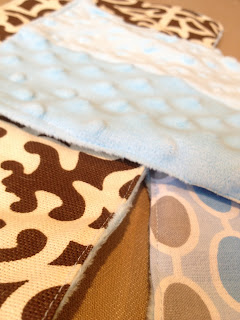
But I still had some fabric left over. So I pieced together some minky scraps, sewed it to some cotton scraps, turned it inside out through a 2" hole I had left, and then top-stitched. Super soft burp cloths or runny-nose wipers! And that project also took about 30 minutes. Very scrappy, but one of a kind!


Great DIY baby gift ideas!


Pin It

Friday, July 20, 2012

Brown and Blue Baby Bedding

I made my daughter Emma's baby bedding (see posts of that by clicking here), so when my cousin Cara asked me to make her baby's bedding, I thought I could do a decent job, so I agreed. After two days of chaos between the dining room table turned into a sewing explosion, and trying to keep my 10 month old from pushing the sewing machine pedal, here it is! I am pleased, Cara is pleased and OBVIOUSLY baby Campbell loves it too! I made the crib skirt, crib bumpers, a blanket, some burp cloths, a throw pillow, AND some stuffed animals (never tried making them before but I LOVE them)


Isn't this room just too classy?! I'll be writing some more posts about the individual pieces soon. Thanks for the opportunity to grow in my skills, Cara! Your baby is one lucky little man!


Pin It

Tuesday, July 10, 2012

Cleaning the Grates on the Stovetop

Cleaning the Grates on the Stovetop With Ammonia


I saw this pin on Pinterest about using ammonia to clean your stovetop grates with no elbow grease involved.  I didn't even know if you could buy ammonia at the grocery, but apparently you can and it's only about $2 for a gallon lifetime supply. I tried it last night and I am AMAZED at the results. Here's how I did it:

Step 1: Place your grates in gallon-sized zipper bags
Step 2: Place them in a glass baking dish in case they leak
Step 3: GO OUTSIDE with them
Step 4: Pour 2-3 tablespoons of ammonia into the zipper bag and seal [quickly--whew that stuff is powerful]
Step 5: Leave them to soak outside overnight
Step 6: In the morning, pour out the ammonia, and wipe them down with clean, soapy water. I did not scrub at all!

I am so happy with how these guys look now. Check out the difference between the grate that wasn't clean and the one that was (I did not touch up these photos at all). Pinterest saves the day again!


Pin It

Monday, July 9, 2012

Necklace Display Frame Tutorial

Necklace Display Frame Tutorial


When I was in high school my necklaces were located in a box in a desk but they always got tangled, so I recently moved them to a side table, where they always looked messy (not to mention that my 9 month old wants to suck on these strings of goodness more than she desires life-sustaining sustenance!). Something had to change. 


I had my eyes peeled for a necklace display frame for many months, but couldn't find one for a reasonable price. So I decided to make my own, but I couldn't find a frame that I liked. However, while wandering through JoAnn last week I stumbled across a bin of frames that were "duds" from the custom framing department. Then I spotted a beauty. Great size, great color AND it was only $6. I grabbed me some 7/8" brass cup hooks for $3, twisted those suckers into the frame, and presto--instant necklace display frame. Best part to me is that it cost only $9 and it's one of a kind. Yes!


Pin It

Wednesday, June 27, 2012

Wedding Day Shadow Box

Wedding Day Shadow Box


A constant reminder of the most perfect day of my life. I love the tangible-ness (is that a word?) of it all. Included is a program, an invitation, my groom's boutonniere, a handkerchief hand-tatted by a friend, a handmade origami wedding favor box (we made about 300 of these puppies) and a love letter. A few hours before we became husband and wife, my favorite fella sent me this love letter confirming the depth of what was about to take place. This memory shadow box hangs in our hallway for all to see. These things are to be treasured always...like our marriage.


Pin It